User Message Detail Maintenance While in User Message Maintenance, you can click a View link to display and add user associations to the corresponding row. Viewing Message Association Details Through User Message Maintenance Clicking a View link displays the screen in User Message Detail Maintenance. User Message Detail Maintenance 
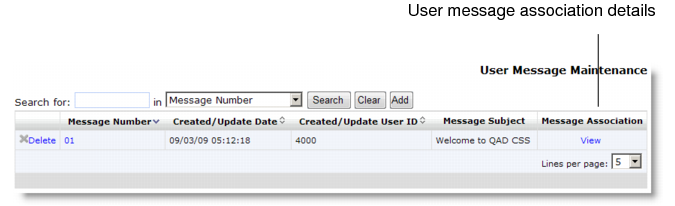
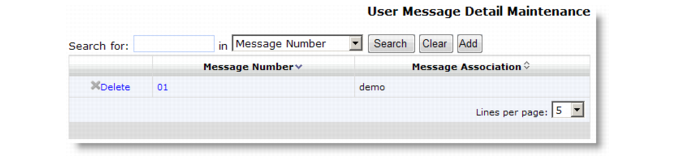
User Message Detail Maintenance Navigation summarizes the contents of the User Message Detail Maintenance navigation screen. User Message Detail Maintenance Navigation Column Search Search Type Sort Description Link Message Number Y Begins Y Unique identifier for this message. Y Message Association Y Begins Y User associated with this message. N Adding a User Message Association Entry The Add function of User Message Detail Maintenance lets an administrator add users and associate them with specific user messages. To create a new entry: 1 Click Add in the navigation window to display the edit screen in Add mode. 2 Enter data into the appropriate fields. 3 Click Add in the edit window to save the record. Detail User Message Detail Maintenance Message Number The number of the corresponding message row. User ID A unique identifier for a QAD CSS user. Message Deleted When this option is selected, the message will not be displayed for this user. This field is also used to indicate that the user has deleted the corresponding user message from the browser. Clicking a command button executes one of the following actions: • Add saves the new record to the database. All required fields—indicated by alternate field color—must be populated prior to saving a record. Before saving, the system verifies that the record is unique and displays an error if it is not. • Cancel closes the window without adding the record. Modifying a User Message Association Entry The Modify function of User Message Detail Maintenance lets an administrator modify existing user association entries. Requirements for adding a record are the same as for editing a record. To modify an entry: 1 Display the record to modify. 2 Click the Message Number link in the row of the record to be modified. Clicking the link displays the edit screen. 3 Enter data into the appropriate fields. Fields that do not allow change are indicated by a second alternate color. 4 Click Save to commit the changes.